This guide provides an overview of the I2P Router Console and its configuration pages. Each section explains what the page does and what it’s meant for, helping you understand how to monitor and configure your I2P router.
Accessing the Router Console
The I2P Router Console is the central hub for managing and monitoring your I2P router. By default, it can be accessed at the I2P Router Console once your I2P router is running.
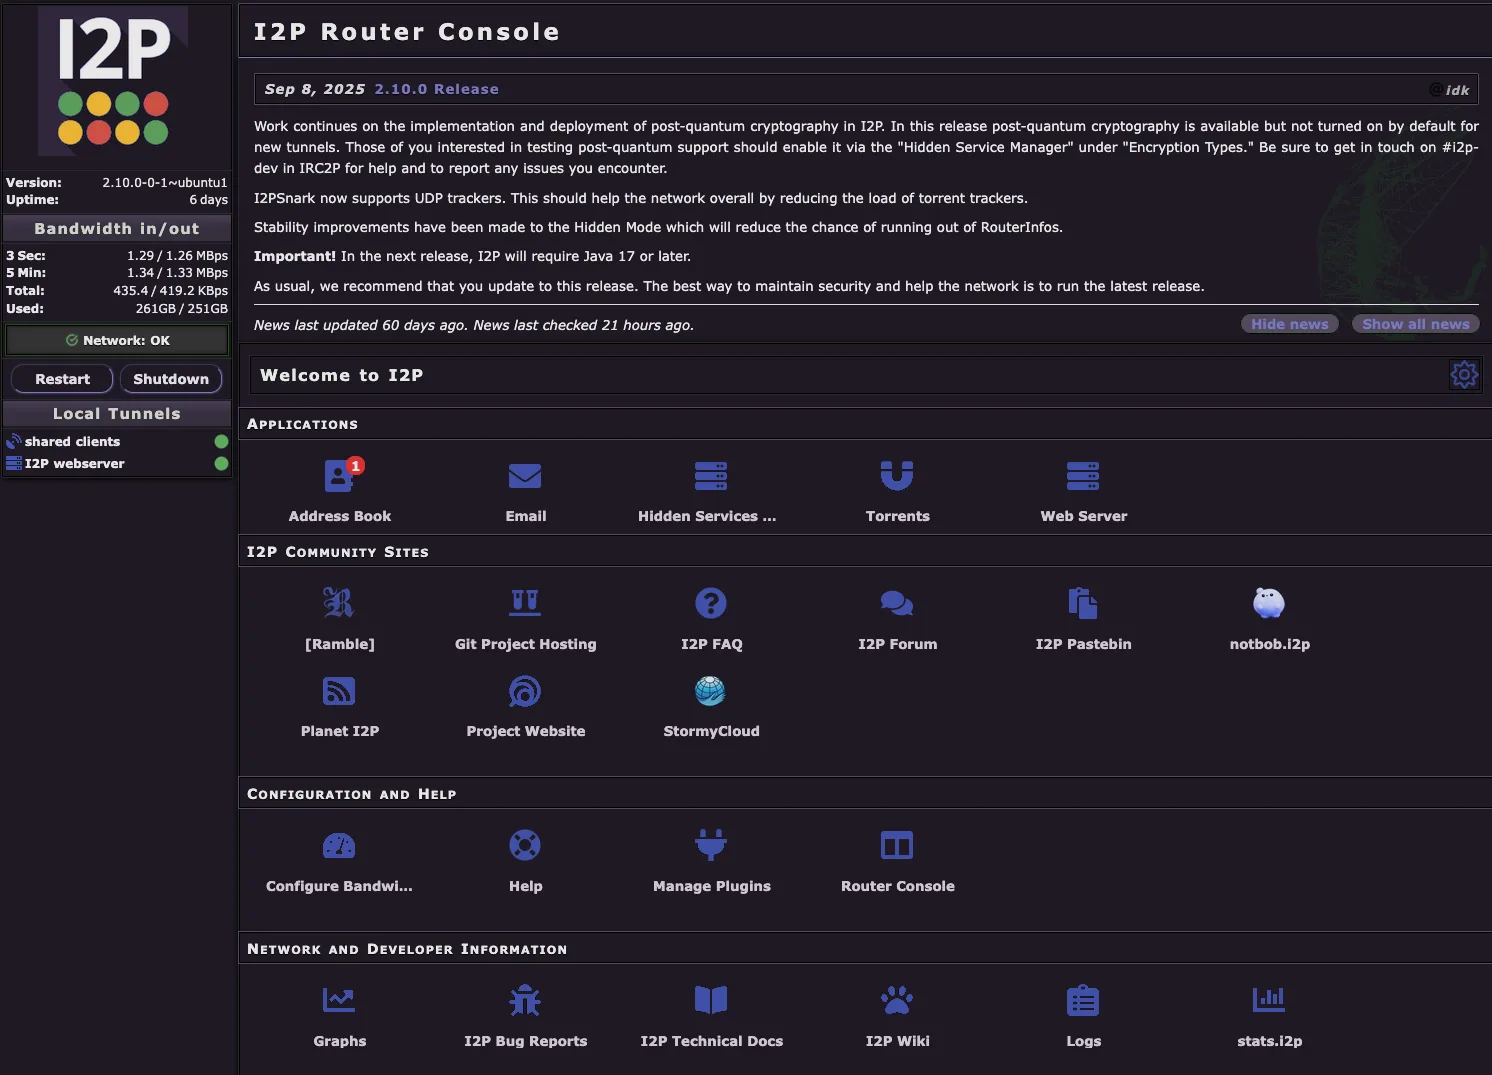
The home page displays several key sections:
- Applications - Quick access to built-in I2P applications like Email, Torrents, Hidden Services Manager, and Web Server
- I2P Community Sites - Links to important community resources including forums, documentation, and project websites
- Configuration and Help - Tools for configuring bandwidth settings, managing plugins, and accessing help resources
- Network and Developer Information - Access to graphs, logs, technical documentation, and network statistics
Address Book
URL: Address Book
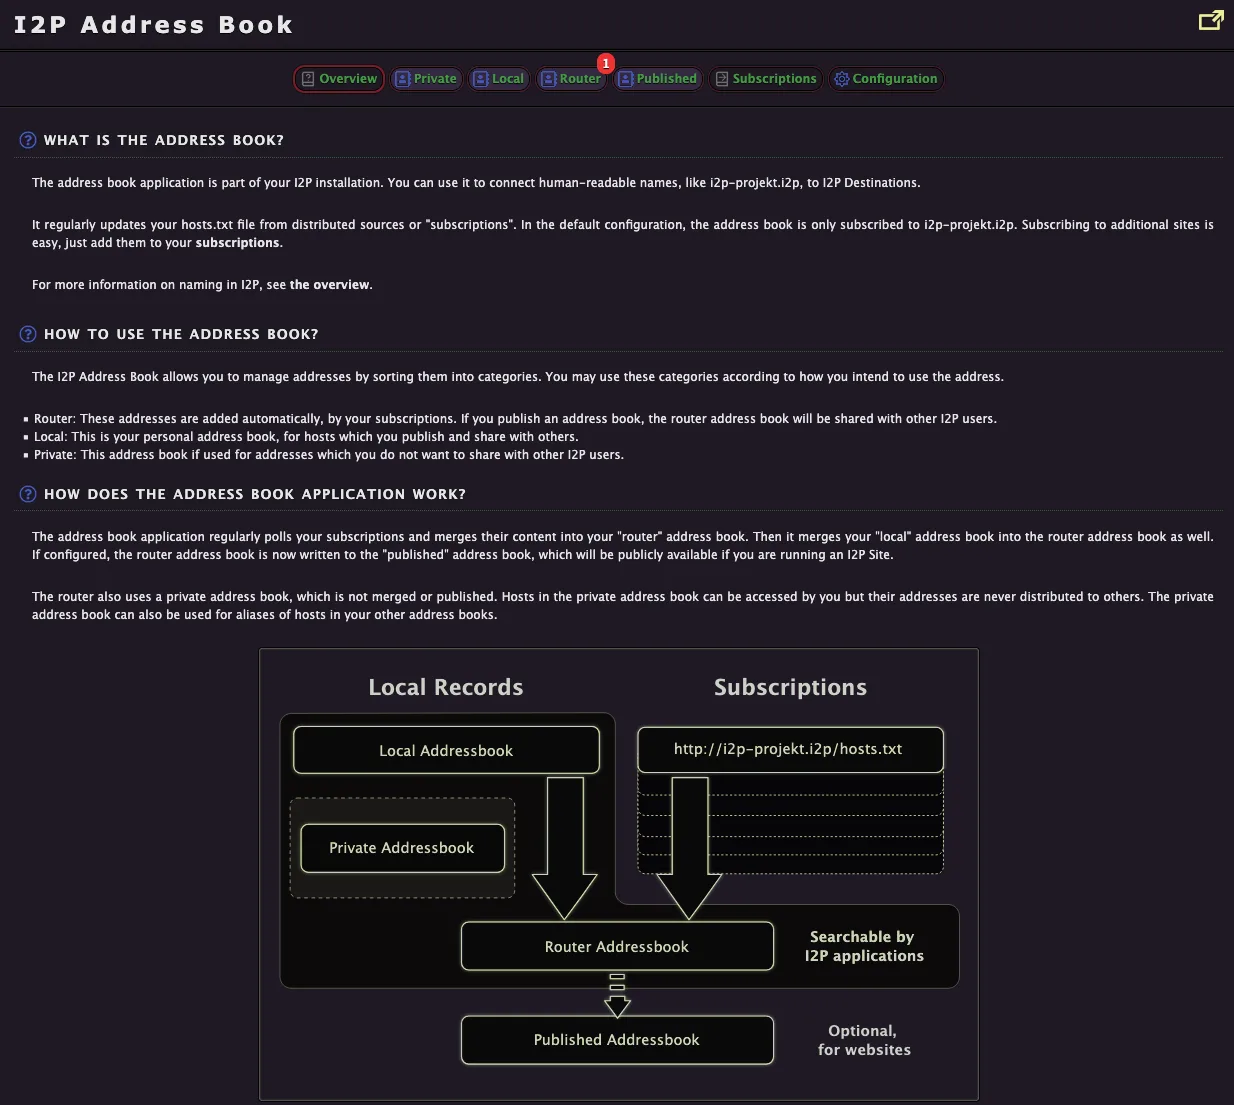
The I2P Address Book functions similarly to DNS on the clearnet, allowing you to manage human-readable names for I2P destinations (eepsites). This is where you can view and add I2P addresses to your personal address book.
The address book system works through multiple layers:
Local Records - Your personal address books that are stored only on your router
- Local Addressbook - Hosts you manually add or save for your own use
- Private Addressbook - Addresses you don’t want shared with others; never distributed publicly
Subscriptions - Remote address book sources (like
http://i2p-projekt.i2p/hosts.txt) that automatically update your router’s address book with known I2P sitesRouter Addressbook - The merged result of your local records and subscriptions, searchable by all I2P applications on your router
Published Addressbook - Optional public sharing of your address book for others to use as a subscription source (useful if you’re running an I2P site)
The address book regularly polls your subscriptions and merges content into your router address book, keeping your hosts.txt file up to date with the I2P network.
Configuration
The Configuration section provides access to all router settings through multiple specialized tabs.
Advanced
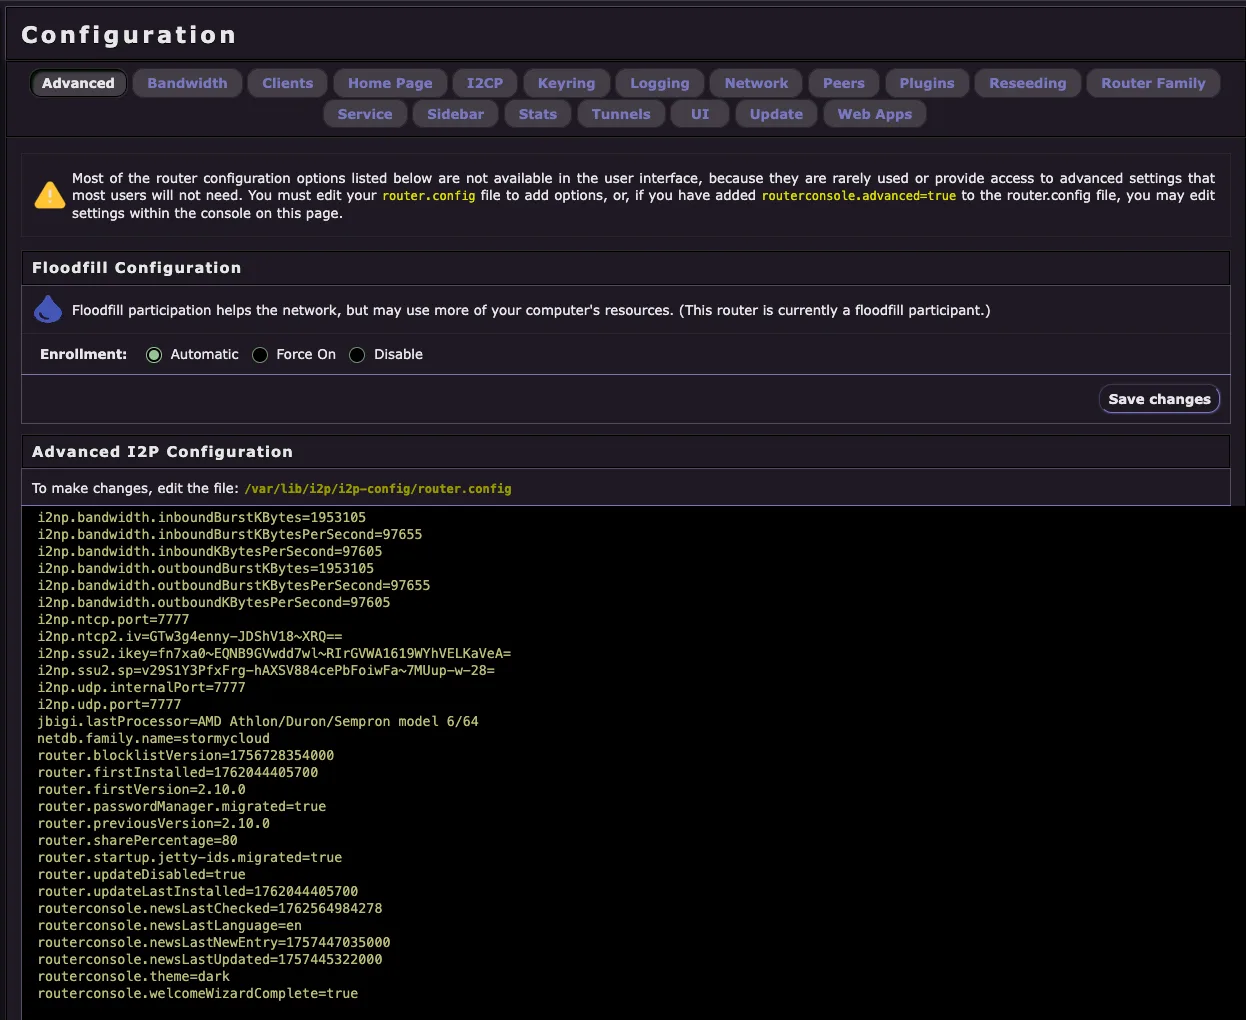
The Advanced configuration page provides access to low-level router settings that are not typically needed for normal operation. Most users should not modify these settings unless they understand the specific configuration option and its impact on router behavior.
Key features:
Floodfill Configuration - Control whether your router participates as a floodfill peer, which helps the network by storing and distributing network database information. This may use more system resources but strengthens the I2P network.
Advanced I2P Configuration - Direct access to the
router.configfile, displaying all advanced configuration parameters including:- Bandwidth limits and burst settings
- Transport settings (NTCP2, SSU2, UDP ports and keys)
- Router identification and version information
- Console preferences and update settings
Most advanced configuration options are not exposed in the user interface because they are rarely needed. To enable editing of these settings, you must add routerconsole.advanced=true to your router.config file manually.
Warning: Incorrectly modifying advanced settings can negatively impact your router’s performance or connectivity. Only change these settings if you know what you are doing.
Bandwidth
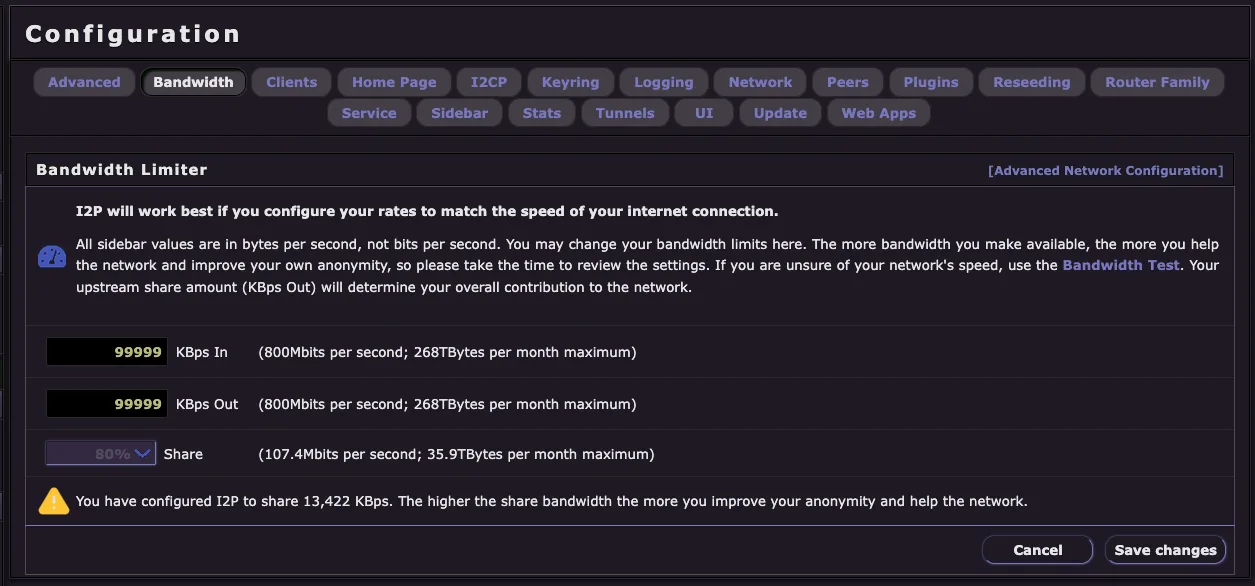
The Bandwidth configuration page allows you to control how much bandwidth your router contributes to the I2P network. I2P works best when you configure your rates to match the speed of your internet connection.
Key Settings:
- KBps In - Maximum inbound bandwidth your router will accept (download speed)
- KBps Out - Maximum outbound bandwidth your router will use (upload speed)
- Share - Percentage of your outbound bandwidth dedicated to participating traffic (helping route traffic for others)
Important Notes:
- All values are in bytes per second (KBps), not bits per second
- The more bandwidth you make available, the more you help the network and improve your own anonymity
- Your upstream share amount (KBps Out) determines your overall contribution to the network
- If you are unsure of your network’s speed, use the Bandwidth Test to measure it
- Higher share bandwidth improves both your anonymity and helps strengthen the I2P network
The configuration page shows estimated monthly data transfer based on your settings, helping you plan bandwidth allocation according to your internet plan limits.
Client Configuration
URL: Client Configuration
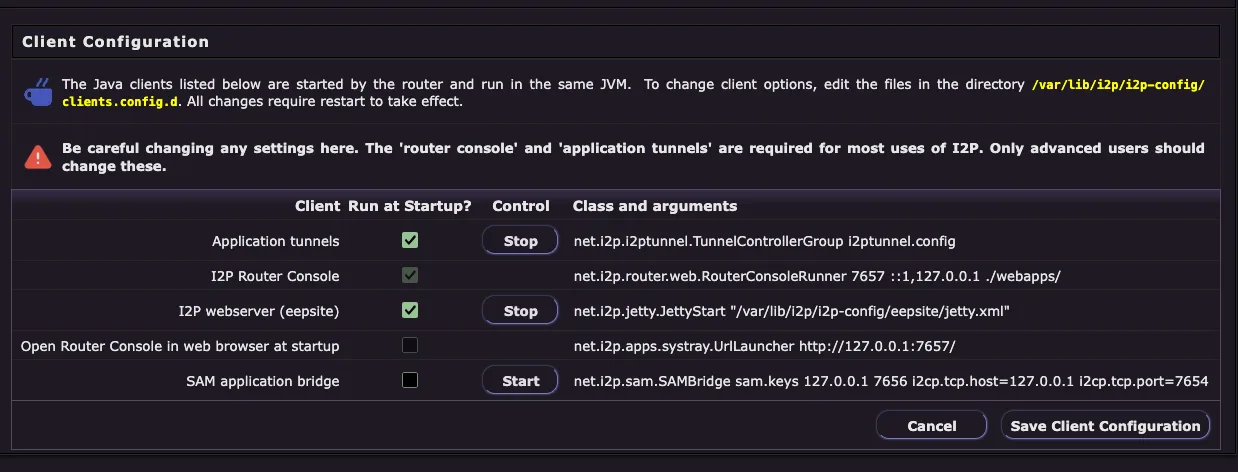
The Client Configuration page allows you to control which I2P applications and services run at startup. This is where you can enable or disable built-in I2P clients without uninstalling them.
Important Warning: Be careful when changing settings here. The router console and application tunnels are required for most uses of I2P. Only advanced users should modify these settings.
Available Clients:
- Application tunnels - The I2PTunnel system that manages client and server tunnels (HTTP proxy, IRC, etc.)
- I2P Router Console - The web-based administration interface you’re currently using
- I2P webserver (eepsite) - Built-in Jetty webserver for hosting your own I2P website
- Open Router Console in web browser at startup - Automatically launches your browser to the console homepage
- SAM application bridge - API bridge for third-party applications to connect to I2P
Each client shows:
- Run at Startup? - Checkbox to enable/disable auto-start
- Control - Start/Stop buttons for immediate control
- Class and arguments - Technical details about how the client is launched
Changes to the “Run at Startup?” setting require a router restart to take effect. All modifications are saved to /var/lib/i2p/i2p-config/clients.config.d/.
I2CP Configuration
URL: I2CP Configuration
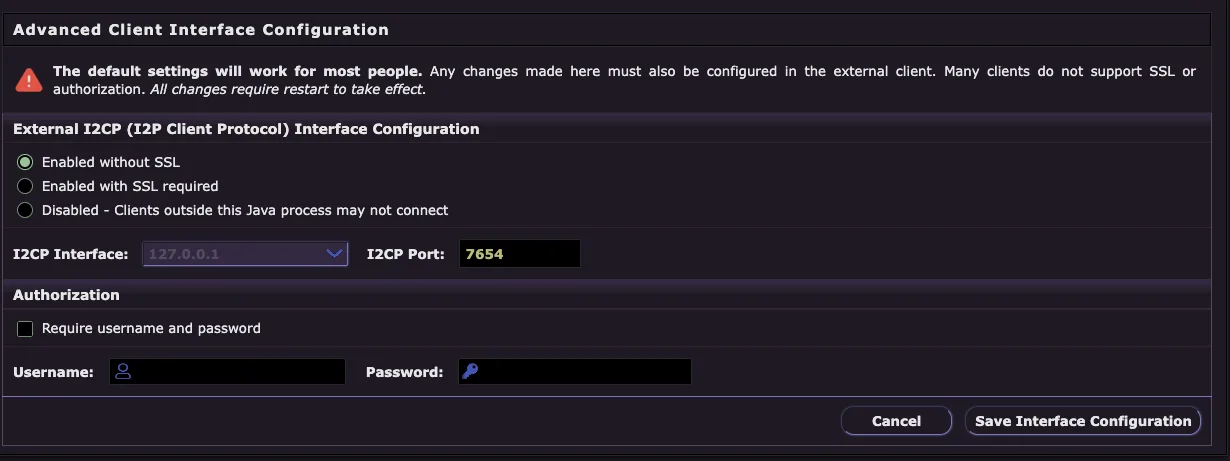
The I2CP (I2P Client Protocol) configuration page allows you to configure how external applications connect to your I2P router. I2CP is the protocol that applications use to communicate with the router to create tunnels and send/receive data over I2P.
Important: The default settings will work for most people. Any changes made here must also be configured in the external client application. Many clients do not support SSL or authorization. All changes require restart to take effect.
Configuration Options:
External I2CP Interface Configuration
- Enabled without SSL - Standard I2CP access (default and most compatible)
- Enabled with SSL required - Encrypted I2CP connections only
- Disabled - Blocks external clients from connecting via I2CP
I2CP Interface - The network interface to listen on (default: 127.0.0.1 for localhost only)
I2CP Port - The port number for I2CP connections (default: 7654)
Authorization
- Require username and password - Enable authentication for I2CP connections
- Username - Set the required username for I2CP access
- Password - Set the required password for I2CP access
Security Note: If you’re only running applications on the same machine as your I2P router, keep the interface set to 127.0.0.1 to prevent remote access. Only change these settings if you need to allow I2P applications from other devices to connect to your router.
Network Configuration
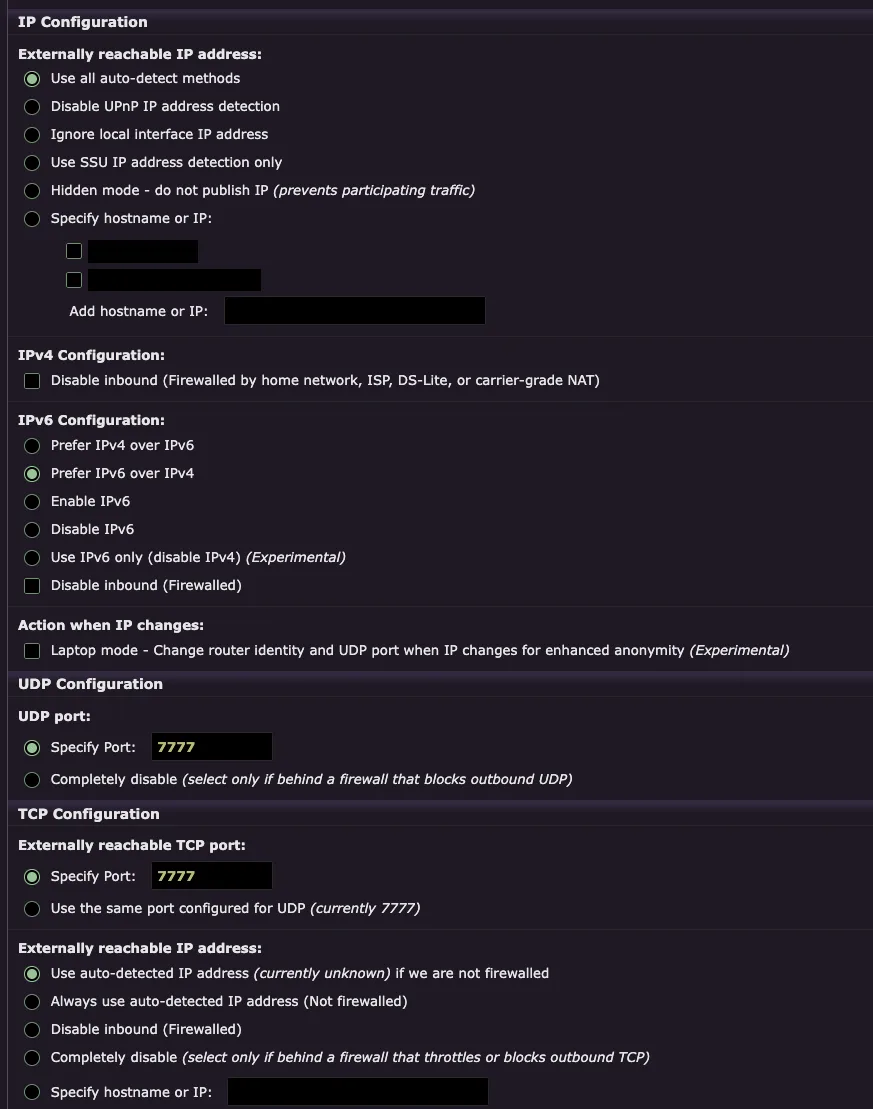
The Network Configuration page allows you to configure how your I2P router connects to the internet, including IP address detection, IPv4/IPv6 preferences, and port settings for both UDP and TCP transports.
Externally Reachable IP Address:
- Use all auto-detect methods - Automatically detects your public IP using multiple methods (recommended)
- Disable UPnP IP address detection - Prevents using UPnP to discover your IP
- Ignore local interface IP address - Don’t use your local network IP
- Use SSU IP address detection only - Only use the SSU2 transport for IP detection
- Hidden mode - do not publish IP - Prevents participating in network traffic (reduces anonymity)
- Specify hostname or IP - Manually set your public IP or hostname
IPv4 Configuration:
- Disable inbound (Firewalled) - Check this if you’re behind a firewall, home network, ISP, DS-Lite, or carrier-grade NAT that blocks inbound connections
IPv6 Configuration:
- Prefer IPv4 over IPv6 - Prioritizes IPv4 connections
- Prefer IPv6 over IPv4 - Prioritizes IPv6 connections (default for dual-stack networks)
- Enable IPv6 - Allows IPv6 connections
- Disable IPv6 - Disables all IPv6 connectivity
- Use IPv6 only (disable IPv4) - Experimental IPv6-only mode
- Disable inbound (Firewalled) - Check if your IPv6 is firewalled
Action When IP Changes:
- Laptop mode - Experimental feature that changes router identity and UDP port when your IP changes for enhanced anonymity
UDP Configuration:
- Specify Port - Set a specific UDP port for SSU2 transport (must be opened in your firewall)
- Completely disable - Only select if behind a firewall that blocks all outbound UDP
TCP Configuration:
- Specify Port - Set a specific TCP port for NTCP2 transport (must be opened in your firewall)
- Use the same port configured for UDP - Simplifies configuration by using one port for both transports
- Use auto-detected IP address - Automatically detects your public IP (shows “currently unknown” if not yet detected or firewalled)
- Always use auto-detected IP address (Not firewalled) - Best for routers with direct internet access
- Disable inbound (Firewalled) - Check if TCP connections are blocked by your firewall
- Completely disable - Only select if behind a firewall that throttles or blocks outbound TCP
- Specify hostname or IP - Manually configure your externally reachable address
Important: Changes to network settings may require a router restart to take full effect. Proper port forwarding configuration significantly improves your router’s performance and helps the I2P network.
Peer Configuration
URL: Peer Configuration
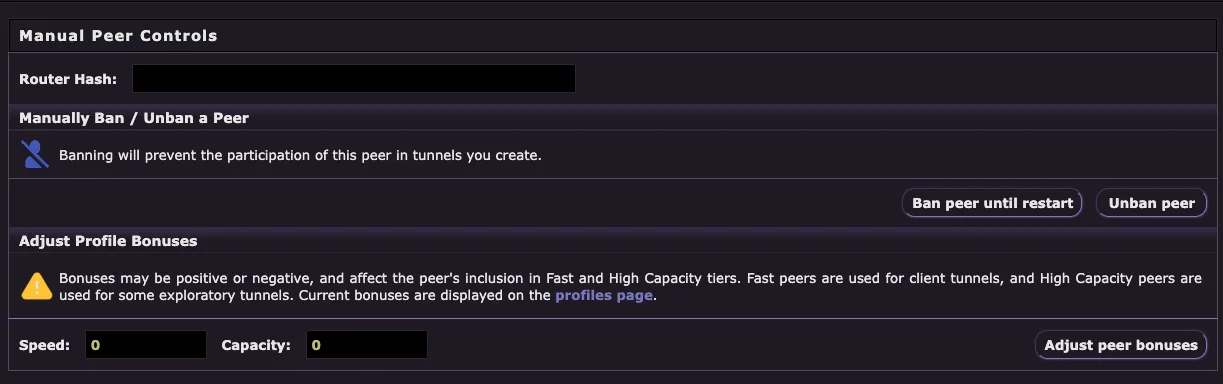
The Peer Configuration page provides manual controls for managing individual peers on the I2P network. This is an advanced feature typically used only for troubleshooting problematic peers.
Manual Peer Controls:
- Router Hash - Enter the 44-character base64 router hash of the peer you want to manage
Manually Ban / Unban a Peer:
Banning a peer prevents them from participating in any tunnels you create. This action:
- Prevents the peer from being used in your client or exploratory tunnels
- Takes effect immediately without requiring a restart
- Persists until you manually unban the peer or restart your router
- Ban peer until restart - Temporarily blocks the peer
- Unban peer - Removes the ban on a previously blocked peer
Adjust Profile Bonuses:
Profile bonuses affect how peers are selected for tunnel participation. Bonuses can be positive or negative:
- Fast peers - Used for client tunnels requiring high speed
- High Capacity peers - Used for some exploratory tunnels requiring reliable routing
- Current bonuses are displayed on the profiles page
Configuration:
- Speed - Adjust the speed bonus for this peer (0 = neutral)
- Capacity - Adjust the capacity bonus for this peer (0 = neutral)
- Adjust peer bonuses - Apply the bonus settings
Use Cases:
- Ban a peer that consistently causes connection issues
- Temporarily exclude a peer you suspect is malicious
- Adjust bonuses to deprioritize underperforming peers
- Debug tunnel building problems by excluding specific peers
Note: Most users will never need to use this feature. The I2P router automatically manages peer selection and profiling based on performance metrics.
Reseed Configuration
URL: Reseed Configuration
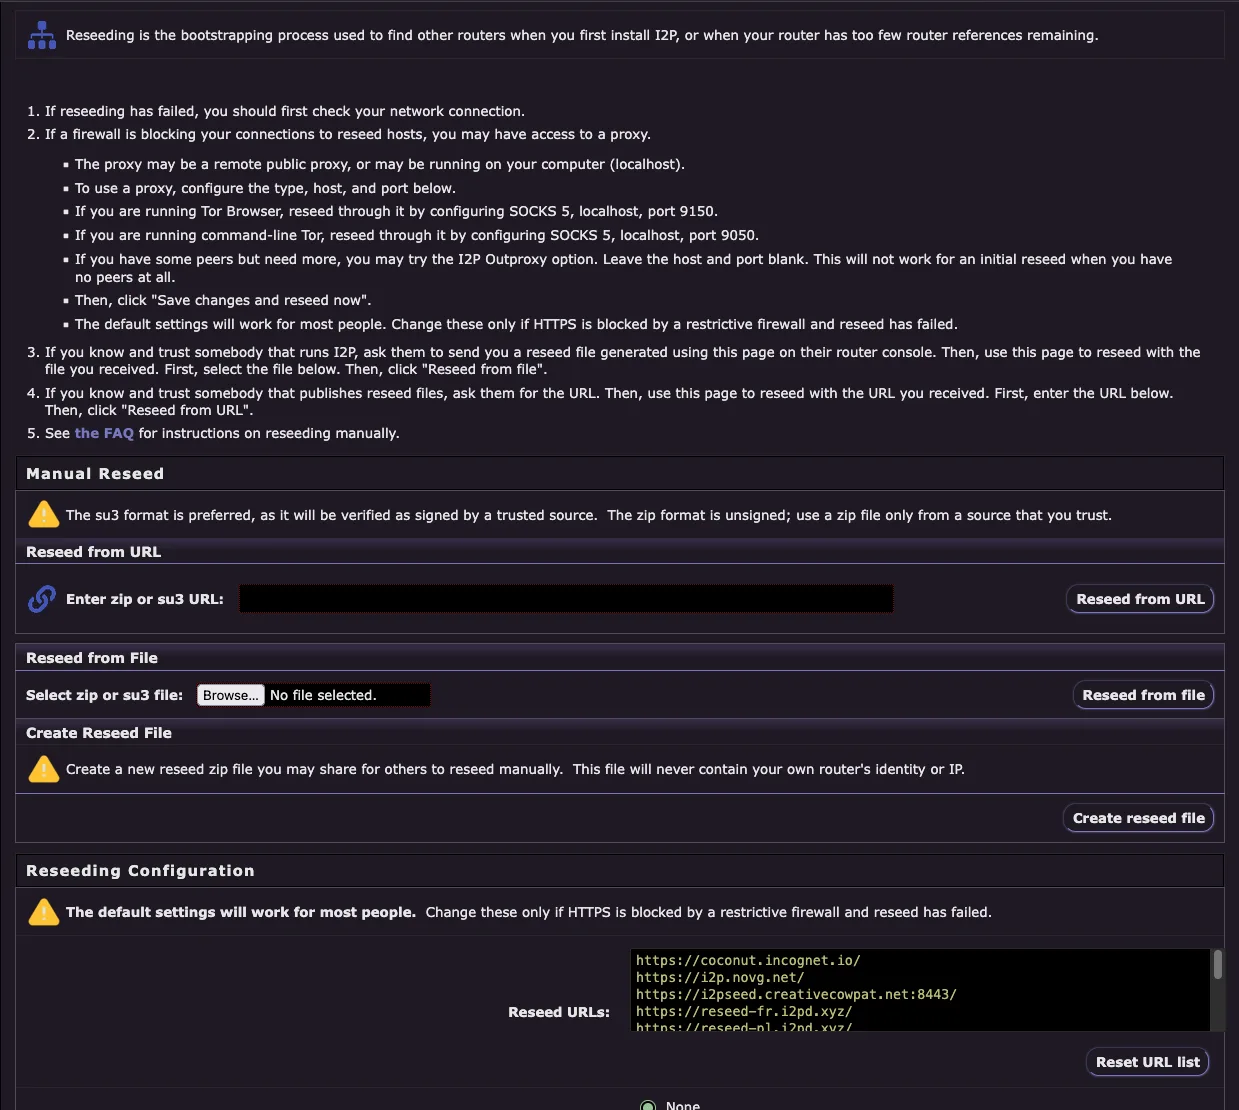
The Reseed Configuration page allows you to manually reseed your router if automatic reseeding fails. Reseeding is the bootstrapping process used to find other routers when you first install I2P, or when your router has too few router references remaining.
When to Use Manual Reseed:
If reseeding has failed, you should first check your network connection
If a firewall is blocking your connections to reseed hosts, you may have access to a proxy:
- The proxy may be a remote public proxy, or may be running on your computer (localhost)
- To use a proxy, configure the type, host, and port in the Reseeding Configuration section
- If you are running Tor Browser, reseed through it by configuring SOCKS 5, localhost, port 9150
- If you are running command-line Tor, reseed through it by configuring SOCKS 5, localhost, port 9050
- If you have some peers but need more, you may try the I2P Outproxy option. Leave the host and port blank. This will not work for an initial reseed when you have no peers at all
- Then, click “Save changes and reseed now”
- The default settings will work for most people. Change these only if HTTPS is blocked by a restrictive firewall and reseed has failed
If you know and trust somebody that runs I2P, ask them to send you a reseed file generated using this page on their router console. Then, use this page to reseed with the file you received. First, select the file below. Then, click “Reseed from file”
If you know and trust somebody that publishes reseed files, ask them for the URL. Then, use this page to reseed with the URL you received. First, enter the URL below. Then, click “Reseed from URL”
See the FAQ for instructions on reseeding manually
Manual Reseed Options:
Reseed from URL - Enter a zip or su3 URL from a trusted source and click “Reseed from URL”
- The su3 format is preferred, as it will be verified as signed by a trusted source
- The zip format is unsigned; use a zip file only from a source that you trust
Reseed from File - Browse and select a local zip or su3 file, then click “Reseed from file”
- You can find reseed files at checki2p.com/reseed
Create Reseed File - Generate a new reseed zip file you may share for others to reseed manually
- This file will never contain your own router’s identity or IP
Reseeding Configuration:
The default settings will work for most people. Change these only if HTTPS is blocked by a restrictive firewall and reseed has failed.
- Reseed URLs - List of HTTPS URLs to reseed servers (default list is built-in and regularly updated)
- Proxy Configuration - Configure HTTP/HTTPS/SOCKS proxy if you need to access reseed servers through a proxy
- Reset URL list - Restore the default reseed server list
Important: Manual reseeding should only be necessary in rare cases where automatic reseeding fails repeatedly. Most users will never need to use this page.
Router Family Configuration
URL: Router Family Configuration
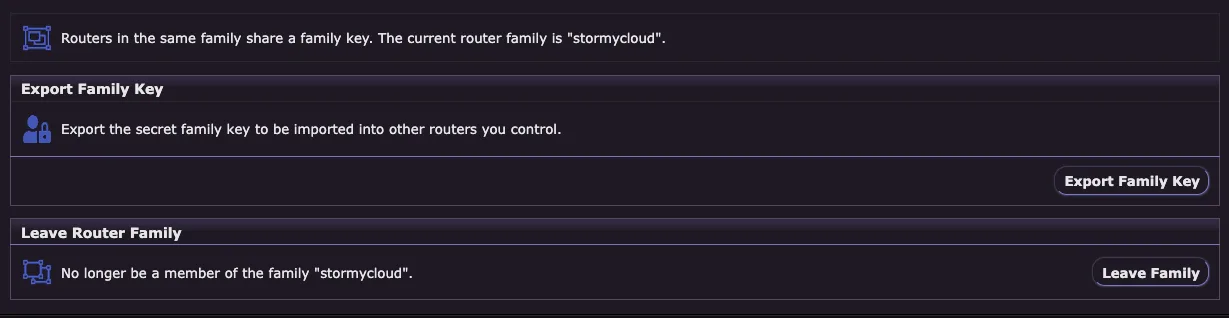
The Router Family Configuration page allows you to manage router families. Routers in the same family share a family key, which identifies them as being operated by the same person or organization. This prevents multiple routers you control from being selected for the same tunnel, which would reduce anonymity.
What is a Router Family?
When you operate multiple I2P routers, you should configure them to be part of the same family. This ensures:
- Your routers won’t be used in the same tunnel path together
- Other users maintain proper anonymity when their tunnels use your routers
- The network can properly distribute tunnel participation
Current Family:
The page displays your current router family name. If you’re not part of a family, this will be empty.
Export Family Key:
- Export the secret family key to be imported into other routers you control
- Click “Export Family Key” to download your family key file
- Import this key on your other routers to add them to the same family
Leave Router Family:
- No longer be a member of the family
- Click “Leave Family” to remove this router from its current family
- This action cannot be undone without re-importing the family key
Important Considerations:
- Public Registration Required: For your family to be recognized network-wide, your family key must be added to the I2P codebase by the development team. This ensures all routers on the network know about your family.
- Contact the I2P team to register your family key if you operate multiple public routers
- Most users running only one router will never need to use this feature
- Family configuration is primarily used by operators of multiple public routers or infrastructure providers
Use Cases:
- Operating multiple I2P routers for redundancy
- Running infrastructure like reseed servers or outproxies on multiple machines
- Managing a network of I2P routers for an organization
Tunnel Configuration
URL: Tunnel Configuration
The Tunnel Configuration page allows you to adjust default tunnel settings for both exploratory tunnels (used for router communication) and client tunnels (used by applications). The default settings work for most people and should only be changed if you understand the tradeoffs.
Important Warnings:
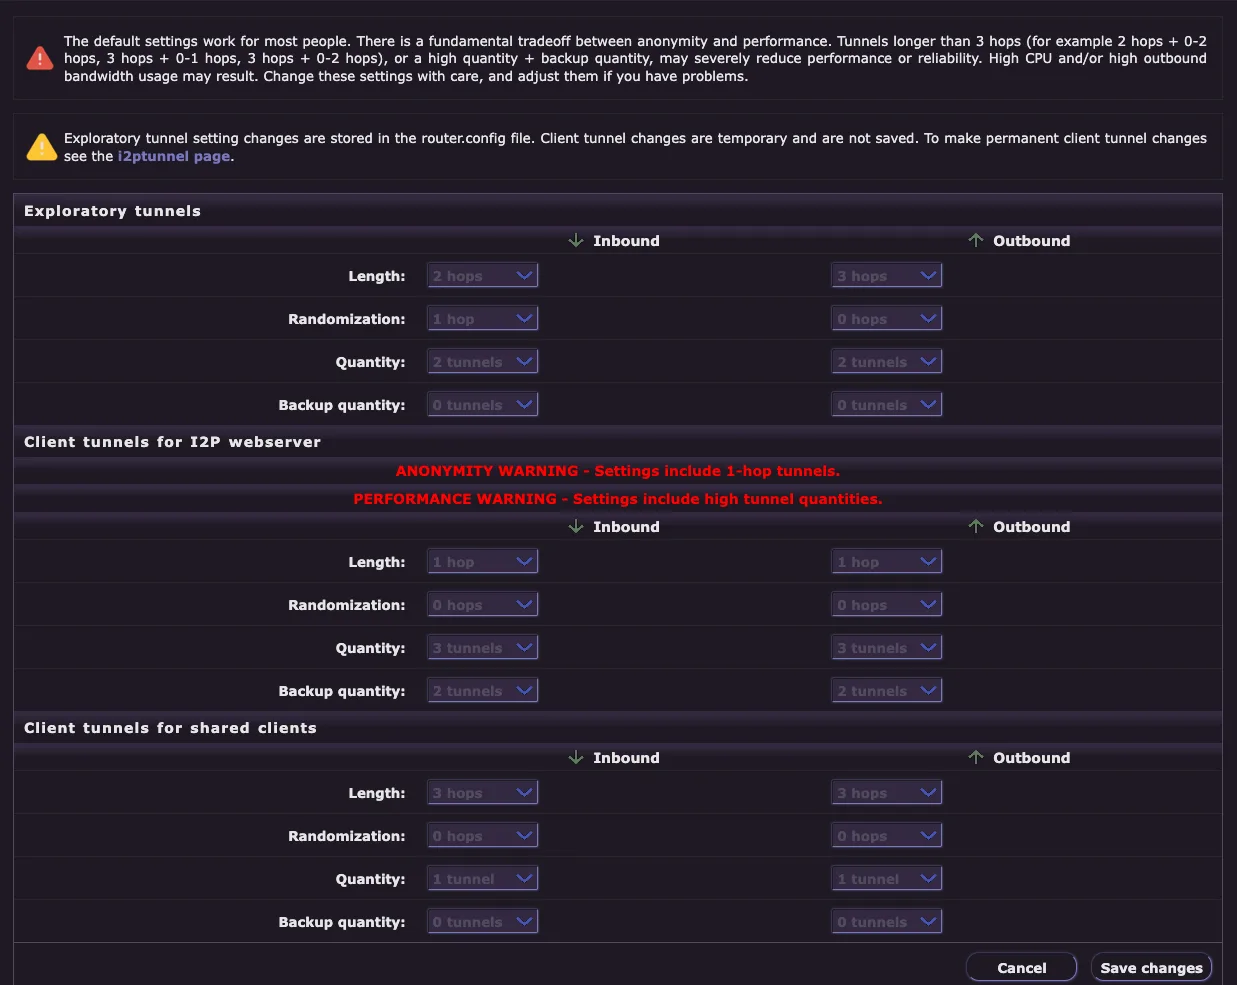
⚠️ Anonymity vs Performance Tradeoff: There is a fundamental tradeoff between anonymity and performance. Tunnels longer than 3 hops (for example 2 hops + 0-2 hops, 3 hops + 0-1 hops, 3 hops + 0-2 hops), or a high quantity + backup quantity, may severely reduce performance or reliability. High CPU and/or high outbound bandwidth usage may result. Change these settings with care, and adjust them if you have problems.
⚠️ Persistence: Exploratory tunnel setting changes are stored in the router.config file. Client tunnel changes are temporary and are not saved. To make permanent client tunnel changes, see the I2PTunnel page .
Exploratory Tunnels:
Exploratory tunnels are used by your router to communicate with the network database and participate in the I2P network.
Configuration options for both Inbound and Outbound:
- Length - Number of hops in the tunnel (default: 2-3 hops)
- Randomization - Random variance in tunnel length (default: 0-1 hops)
- Quantity - Number of active tunnels (default: 2 tunnels)
- Backup quantity - Number of backup tunnels ready to activate (default: 0 tunnels)
Client Tunnels for I2P Webserver:
These settings control tunnels for the built-in I2P webserver (eepsite).
⚠️ ANONYMITY WARNING - Settings include 1-hop tunnels. ⚠️ PERFORMANCE WARNING - Settings include high tunnel quantities.
Configuration options for both Inbound and Outbound:
- Length - Tunnel length (default: 1 hop for webserver)
- Randomization - Random variance in tunnel length
- Quantity - Number of active tunnels
- Backup quantity - Number of backup tunnels
Client Tunnels for Shared Clients:
These settings apply to shared client applications (HTTP proxy, IRC, etc.).
Configuration options for both Inbound and Outbound:
- Length - Tunnel length (default: 3 hops)
- Randomization - Random variance in tunnel length
- Quantity - Number of active tunnels
- Backup quantity - Number of backup tunnels
Understanding Tunnel Parameters:
- Length: Longer tunnels provide more anonymity but reduce performance and reliability
- Randomization: Adds unpredictability to tunnel paths, improving security
- Quantity: More tunnels improve reliability and load distribution but increase resource usage
- Backup quantity: Pre-built tunnels ready to replace failed tunnels, improving resilience
Best Practices:
- Keep default settings unless you have specific needs
- Only increase tunnel length if anonymity is critical and you can accept slower performance
- Increase quantity/backup only if experiencing frequent tunnel failures
- Monitor router performance after making changes
- Click “Save changes” to apply modifications
UI Configuration
URL: UI Configuration
The UI Configuration page allows you to customize the appearance and accessibility of your router console, including theme selection, language preferences, and password protection.
Router Console Theme:
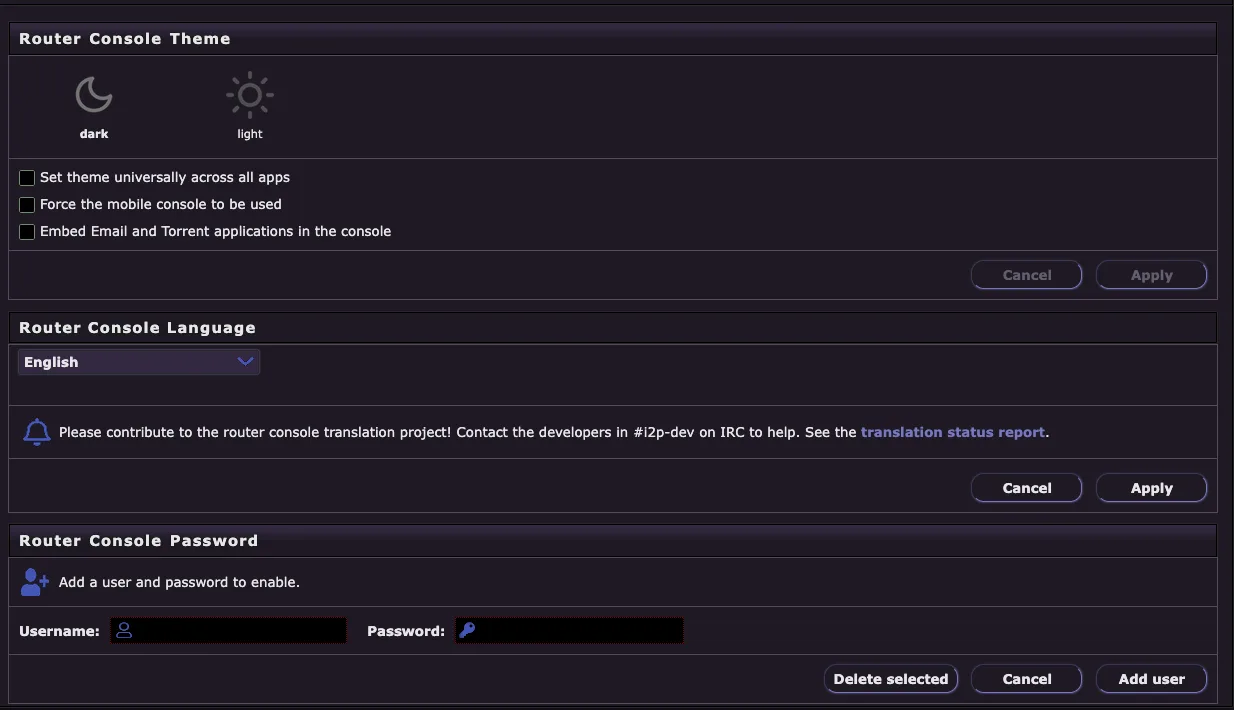
Choose between dark and light themes for the router console interface:
- Dark - Dark mode theme (easier on the eyes in low-light environments)
- Light - Light mode theme (traditional appearance)
Additional theme options:
- Set theme universally across all apps - Apply the selected theme to all I2P applications, not just the router console
- Force the mobile console to be used - Use the mobile-optimized interface even on desktop browsers
- Embed Email and Torrent applications in the console - Integrate Susimail and I2PSnark directly into the console interface instead of opening them in separate tabs
Router Console Language:
Select your preferred language for the router console interface from the dropdown menu. I2P supports many languages including English, German, French, Spanish, Russian, Chinese, Japanese, and more.
Translation contributions welcome: If you notice incomplete or incorrect translations, you can help improve I2P by contributing to the translation project. Contact the developers in #i2p-dev on IRC or check the translation status report (linked on the page).
Router Console Password:
Add username and password authentication to protect access to your router console:
- Username - Enter the username for console access
- Password - Enter the password for console access
- Add user - Create a new user with the specified credentials
- Delete selected - Remove existing user accounts
Why Add a Password?
- Prevents unauthorized local access to your router console
- Essential if multiple people use your computer
- Recommended if your router console is accessible on your local network
- Protects your I2P configuration and privacy settings from tampering
Security Note: Password protection only affects access to the router console web interface at the I2P Router Console . It does not encrypt I2P traffic or prevent applications from using I2P. If you’re the only user of your computer and the router console only listens on localhost (default), a password may not be necessary.
WebApp Configuration
URL: WebApp Configuration
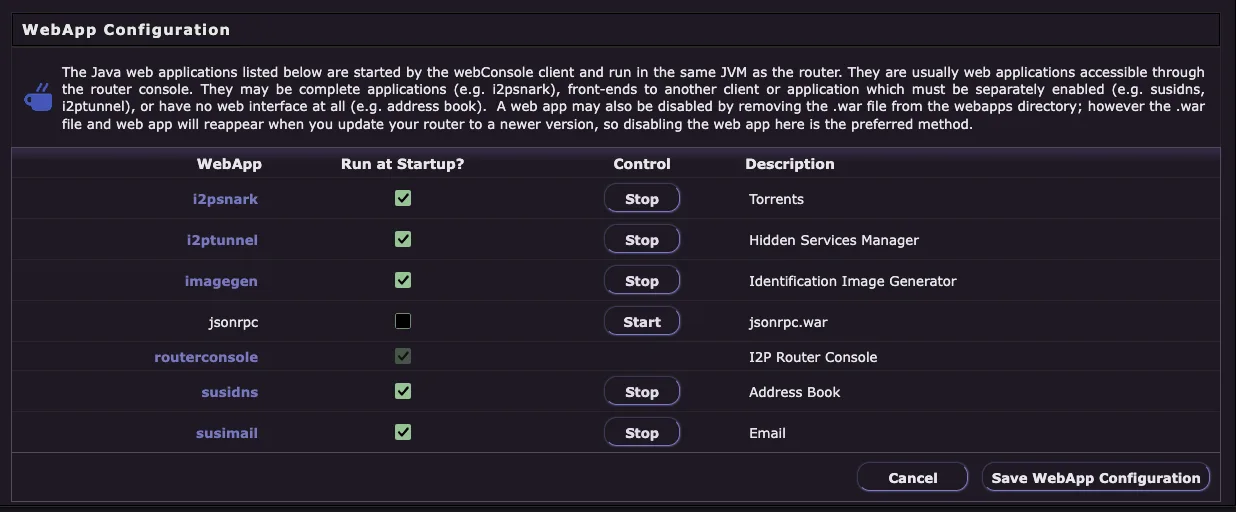
The WebApp Configuration page allows you to manage the Java web applications that run within your I2P router. These applications are started by the webConsole client and run in the same JVM as the router, providing integrated functionality accessible through the router console.
What are WebApps?
WebApps are Java-based applications that can be:
- Complete applications (e.g. I2PSnark for torrents)
- Front-ends to other clients that must be separately enabled (e.g. Susidns, I2PTunnel)
- Web applications with no web interface (e.g. address book)
Important Notes:
- A webapp may be disabled completely, or it may just be disabled from running at startup
- Removing a war file from the webapps directory disables the webapp completely
- However, the .war file and webapp directory will reappear when you update your router to a newer version
- To permanently disable a webapp: Disable it here, which is the preferred method
Available WebApps:
| WebApp | Description |
|---|---|
| i2psnark | Torrents - Built-in BitTorrent client for I2P |
| i2ptunnel | Hidden Services Manager - Configure client and server tunnels |
| imagegen | Identification Image Generator - Creates unique identicons |
| jsonrpc | jsonrpc.war - JSON-RPC API interface (disabled by default) |
| routerconsole | I2P Router Console - The main administrative interface |
| susidns | Address Book - Manage I2P addresses and subscriptions |
| susimail | Email - Web-based email client for I2P |
Controls:
For each webapp:
- Run at Startup? - Checkbox to enable/disable automatic startup
- Control - Start/Stop buttons for immediate control
- Stop - Stops the currently running webapp
- Start - Starts a stopped webapp
Configuration Buttons:
- Cancel - Discard changes and return to the previous page
- Save WebApp Configuration - Save your changes and apply them
Use Cases:
- Stop I2PSnark if you don’t use torrents to save resources
- Disable jsonrpc if you don’t need API access
- Stop Susimail if you use an external email client
- Temporarily stop webapps to free up memory or troubleshoot issues
Performance Tip: Disabling unused webapps can reduce memory usage and improve router performance, especially on low-resource systems.
Help
URL: Help
The Help page provides comprehensive documentation and resources to help you understand and use I2P effectively. It serves as a central hub for troubleshooting, learning, and getting support.
What You’ll Find:
- Quick Start Guide - Essential information for new users getting started with I2P
- Frequently Asked Questions (FAQ) - Answers to common questions about I2P installation, configuration, and usage
- Troubleshooting - Solutions to common problems and connectivity issues
- Technical Documentation - Detailed information about I2P protocols, architecture, and specifications
- Application Guides - Instructions for using I2P applications like torrents, email, and hidden services
- Network Information - Understanding how I2P works and what makes it secure
- Support Resources - Links to forums, IRC channels, and community support
Getting Help:
If you’re experiencing issues with I2P:
- Check the FAQ for common questions and answers
- Review the troubleshooting section for your specific problem
- Visit the I2P forum at
i2pforum.i2por i2pforum.net - Join the IRC channel #i2p for real-time community support
- Search the documentation for detailed technical information
Tip: The help page is always accessible from the router console sidebar, making it easy to find assistance whenever you need it.
Performance Graphs
URL: Performance Graphs
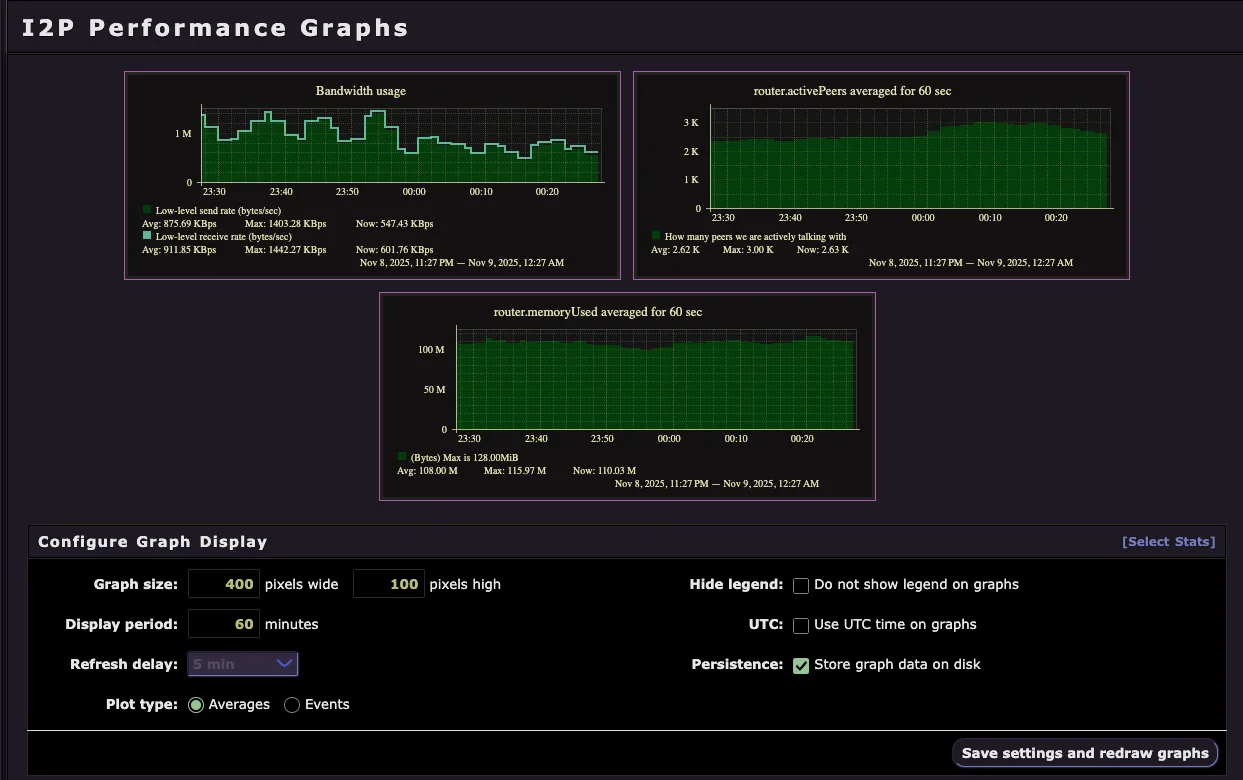
The Performance Graphs page provides real-time visual monitoring of your I2P router’s performance and network activity. These graphs help you understand bandwidth usage, peer connections, memory consumption, and overall router health.
Available Graphs:
Bandwidth Usage
- Low-level send rate (bytes/sec) - Outbound traffic rate
- Low-level receive rate (bytes/sec) - Inbound traffic rate
- Shows current, average, and maximum bandwidth utilization
- Helps monitor if you’re approaching your configured bandwidth limits
Active Peers
- router.activePeers averaged for 60 sec - Number of peers you’re actively communicating with
- Shows the health of your network connectivity
- More active peers generally means better tunnel building and network participation
Router Memory Usage
- router.memoryUsed averaged for 60 sec - JVM memory consumption
- Shows current, average, and maximum memory usage in MB
- Useful for identifying memory leaks or determining if you need to increase Java heap size
Configure Graph Display:
Customize how graphs are displayed and refreshed:
- Graph size - Set width (default: 400 pixels) and height (default: 100 pixels)
- Display period - Time range to display (default: 60 minutes)
- Refresh delay - How often graphs update (default: 5 minutes)
- Plot type - Choose between Averages or Events display
- Hide legend - Remove the legend from graphs to save space
- UTC - Use UTC time instead of local time on graphs
- Persistence - Store graph data on disk for historical analysis
Advanced Options:
Click [Select Stats] to choose which statistics to graph:
- Tunnel metrics (build success rate, tunnel count, etc.)
- Network database statistics
- Transport statistics (NTCP2, SSU2)
- Client tunnel performance
- And many more detailed metrics
Use Cases:
- Monitor bandwidth to ensure you’re not exceeding your configured limits
- Verify peer connectivity when troubleshooting network issues
- Track memory usage to optimize Java heap settings
- Identify performance patterns over time
- Diagnose tunnel building problems by correlating graphs
Tip: Click “Save settings and redraw graphs” after making changes to apply your configuration. The graphs will refresh automatically based on your refresh delay setting.